DEFORMING SKIN
Jean-Francois Fortin: Setting Skin with syCloth
Jean-Francois Fortin is a TD Chraracter Rigger currently working in a feature film
production. Jean-Francois was kind enough to share with us here his experience
using syCloth to create skin over his digital muscles:
"I had been doing 3D professionaly since 1999, using Sofimage at first, before
switching to Maya. Two years ago I discovered syFlex, which is the best cloth
simulation I have tried. It's really fast and easy to use! With a couple of
hours on syFlex you can get pretty nice results."
"SyFlex is great for the kind of work I do, as I need to reach realistic results
in a short amount of time, and everyone knows how important time is in 3D production...
Now with syFlex 3.0, come the implementation of new features like sySkin and syFlesh,
and the rescale attribute, which l love. The blend cache is also really useful
for action shots, where you have to get different settings depending on the movement.
For this tutorial, I used syCloth and the rescale attribute because it enables me to have the skin shrink
on the muscle whatever happens. l hope you will enjoy my tutorial."
Jean-Francois used syFlex 3.0 on Maya 6.0.
01. CREATE THE MUSCLES to be skinned:
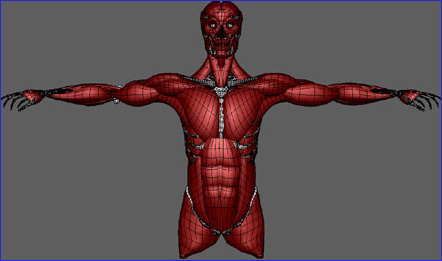
Jean-Francois' muscles model
Here is my model with all the muscles I am going to skin piece
by piece.
I select all my muscles and bones and use Maya's skin on selected bones.
Here are the values I use:
Max influences: 1
Dropoff Rate: 4
I use those settings because I want each muscle (OBJECT) to be skinned
only at the closest joint, so that I don't have vertices
skinned to some bones far from the main bone-set. This helps me work faster.
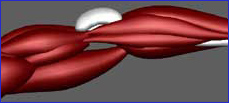
02. MUSCLES DEFORMATION:
After all my muscles are skinned properly, I am using Sculpt Deformer and Blend
Shapes to add some muscle deformations. Here is an example of shapes with Sculpt
Deformer on the arm.
I added some Sculpt Deformer on the stomach area and on the pectoral area
as well. You can add some jiggling to some part of your system to achieve more realism,
either with Maya's internal Jiggle, or with dynamic
curve and a combination of wrap. There is also
syFlesh now which can be used for that purpose.
But those things are for another tutorial...
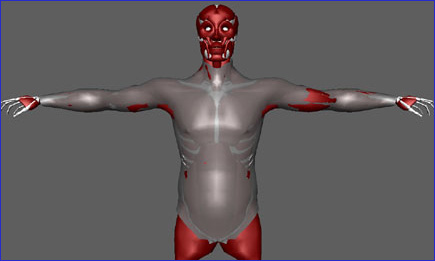
03. CREATE YOUR SKIN SHAPE, make a poly mesh:
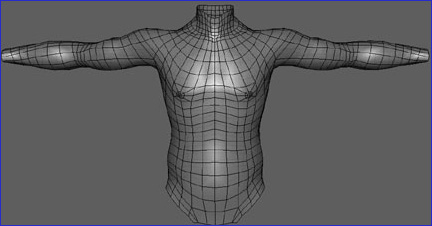
Modeling the skin shape
Here is the skin mesh I built in Maya, to be turned into a syCloth.
You should try to keep the topology really clean, the simulation responds
to every muscle line so keeping it
simple will give you the best results.
I skined every piece separately using Maya's smooth skin, sculpt deformer and
blend shape to fix some areas and achieve some sort of fake muscle deformation.
04. CREATE CLOTH, turn your mesh into skin:
When you are happy with your mesh, you are ready to setup the skin with syFlex.
I am using a low-res mesh for my simulation, so the computation is really fast, and
I can make many tests. Later I am using Wrap Deformer to deform a high-res mesh.
Select your skin mesh and call:
Syflex > Cloth > Create Cloth
I am using syCloth and not sySkin because of one attribute which doesn't exist
for sySkin yet, the Rescale attribute. You will see why later.
05. CREATE WEIGHT, add Volume and Global Damping:
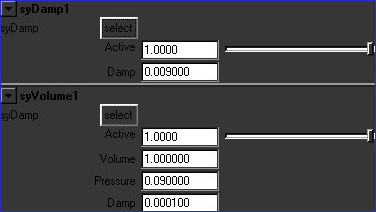
Entering the values for the forces in the syEdit window
Now that your mesh is converted into a syCloth, you can add forces
onto it. Select it and call:
Syflex > Forces > Create Volume
The Volume force preserves the volume of the shape, this force works
better on a closed mesh, but it is very useful here.
Add damping:
Syflex > Forces > Create Damp
The Damp force slows down the animation and
at the same time removes any unwanted jiggling which is created as a result of quick
movement. The more violent the movement in your animation, the higher you
should set the global Damping (the Damp force value). However, raising this value
also increases the computation time, so be careful with it.
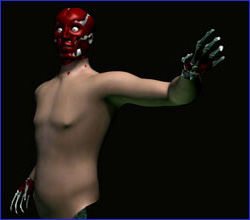
06. CONNECT THE SKIN, pin it to the bones:
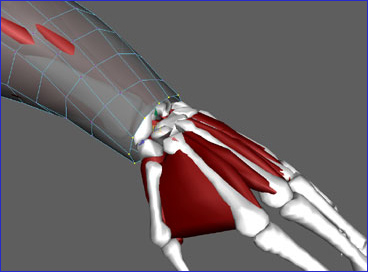
Skin pinned to the wrist
Select the extreme vertices of the skin, and the object it needs to
be connected to, like the wrist muscle in the example here.
Pin the skin to the muscle, by selecting both and calling:
Syflex > Constraints > Pin
I pined the skin in the example here to the neck,
the wrist and the base of the torso.
07. CREATE COLLISION OBJECTS:
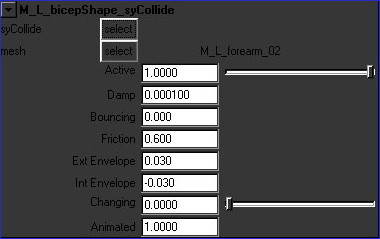
Collisions and Friction
Now you can start adding collisions between the skin and the muscles or bones it
needs to be affected by.
Remember to name all your collisions, it helps to keep track of which object is
a colider and which is not.
In this scene I have more than 45 collision objects so naming them was really
useful!
For the collisions I entered the following values in the attributes:
Envelope_ext: 0.03
Envelope_int: 0.03
08. DEFINE SKIN BEHAVIOUR, by using the Friction attribute:
For some area we want the skin to stick more to the collision objects, and in
other areas, it needs to have a sliding effect. Here is an overview of the different Friction values I entered for the different
skin parts:
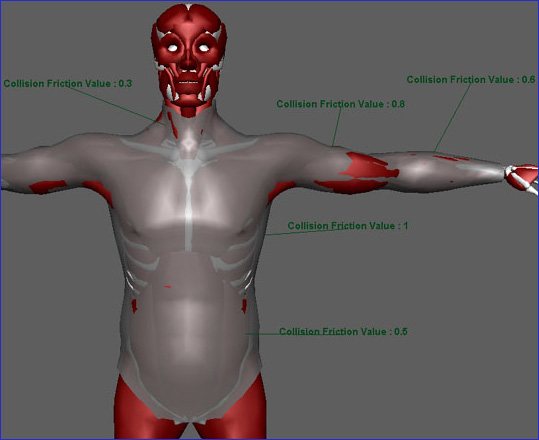
Friction values
09. HAVE YOUR SKIN SHRINK AROUND THE MUSCLES, by using the Rescale attribute:
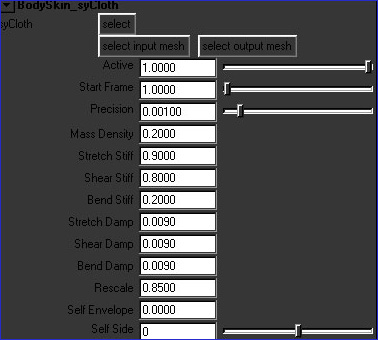
The syCloth Attributes
In the syCloth Attributes Editor window, you will find a new attribute introduced in
syFlex 3.0; Rescale.
Rescale is extremely powerful for our skin
simulation. It makes the skin shrink around the muscles!
When you have a muscle bulge or any deformation, you can see clearly the
sliding of the mesh on that muscle according to the Rescale value.
For my simulation, I found that the value 0.85 works best.
I worked with the Damping to help remove some wavy effects
which occurred.
As to the rest of the attributes: Mass Density will influance the animation
although we are not using Gravity here, so pay attention to it. I left Self
Envelope on 0 because there is no self collision here.
10. ADJUST THE SKIN ATTRIBUTES:
After you have the setup in place; Skin, Forces, Collisions and Friction,
you can start tweaking the parameters, until you reach
the effect you are after.
While testing, you can drop the precision attribute to 0.01. The simulation will be
less accurate, but much faster.
For better understanding of how the body and the skin move, just
look in the mirror! I also looked at many anatomy books.
I hope you liked this tutorial. If you have any question or comments, please
send me a email at mail@jfortin.com.
Jean-francois Fortin is a TD Setup Artist. You can visit his website here:
www.jfortin.com
In-depth information about every aspect of SyFlex, including the elements used in
this tutorial, are available in the software documentation.
If you have any additional questions, do contact us at:
users@syflex.biz
|